Thursday, December 30, 2010

My Crafty Must-Haves for 2010

The year is winding down to an end, and I am seeing lists everywhere in bloggy land.  Wish lists, gift lists, mailing lists, to-do lists and of course, shopping lists.  The season of The List is upon us! So I decided to put together my own list:  my top ten go-to crafty supplies for 2010.  Thanks for looking!


1. ATG 714 Applicator and 3m Gold 1/4 inch tape:  This is hands down the best adhesive I have used.  It's also the cheapest!  The initial cost can be a little daunting so I had to really weigh the pros and cons of this one before I laid down the cash.  I have been using this for over a year now, and I love it-and the money it has saved me (i.e. allowed me to spend on other crafty goodness).  I buy all of my refills at the Tape Depot.  They have free shipping if you spend $50.  The refills are so cheap, that I usually have a friend go in on the purchase with me, and we each get a case of 12 rolls.  That STILL only comes to about 46 dollars, so I usually toss in a roll of their funky duct tape so I can get the free shipping.  36 yards of adhesive per roll.  108 feet of adhesive per roll.  1296 inches of adhesive per roll.  12 rolls to a case equals 15552 inches of adhesive for less than $23.  The math speaks for itself!  Michael's now offers the pink version of the ATG gun, and you can even use one of the 40% or 50% off coupons!  Go get you o0ne today, if you haven't already.
 2.  Fiskars 12" Portable Rotary Trimmer:  I have been scrapbooking for over five years now, and I have probably gone through ten or twelve trimmers looking for the perfect one for me.  I fell in love with this trimmer from the first time I used it.  It has great precision and is easy to use.  I use it on a LOT of paper and chipboard.  The blades last a long time and when it does come time to change the blade it is very easy to do.  There is also a large variety of different style blades to use in this trimmer.  I tend to do a lot of crafting away from home, so this trimmer is the perfect size for me, and meets all of my needs. 
3.  Tim Holtz 12" Design Ruler:  Tim Holtz is a genius with tools! This is no ordinary craft ruler - Tim, as usual, kicks it up several notches!  This clear, acrylic ruler will solve the need for any other - and I must agree with Tim - this tool will make your other rulers obsolete.  This Design Ruler features:
  • tapered edge - perfect for drawing lines
  • metal edge - ideal for cutting paper with a craft knife
  • zero to twelve, marked in inches. No weird starting points - it starts where the acrylic starts!
  • centering ruler - locate the center of large or small pieces of paper quickly and easily.
  • grids on ruler allow perfect alignment - both vertically and horizontally!
  • saved the best for last: ruler features a row of 1/8" pierced holes completely through the ruler. This allows you to pierce holes neatly, evenly and quickly at whatever spacing interval your crafting needs demand! Holes are easy to spot and space visually, makes completing your paper piercing a snap.  Tim's Design Ruler measures just over 1-1/2" in height and exactly 12" in length.


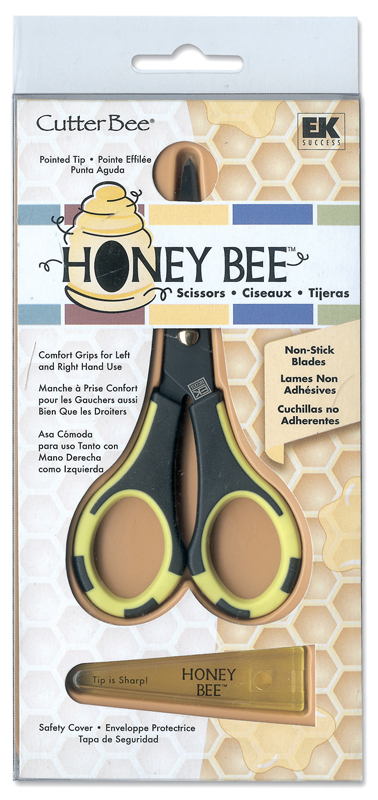
4. Honey Bee Scissors
 Scrapbook.com says these are the perfect scissors for cuts that are tricky, and crafts that are sticky. The Honey Bee craft scissors by Cutter Bee are great for cutting through even the stickiest of materials. These sticker scissors are non-stick and can fly around your crafts for an easy cut every time.


  • Comfort grip handles


  • Comes with a protective safety cover


  • Precision-ground tips can cut in the tiniest of areas


  • Cut stickers, adhesive foam, and other adhesives quickly 


  • I have two pair just in case I am ever more than an arms reach from these.


    5.Tonic Studios - Tim Holtz - Non-Stick Micro Serrated Scissors: 

    These are a recent purchase for me, and I have no idea how I survived without them for so long.  I bought them for the specific job of cutting apart my growing collection of unmounted rubber stamps.
    These Non-Stick Micro Serrated Scissors by Tim Holtz by Tonic Studios are perfect for scrapbooking and paper projects.


  • Resistant to rust and corrosion


  • Non-stick coating minimizes adhesive build up


  • Extra large Kushgrip Handles for comfort and less fatigue


  • Micro serrated edge great for detail cutting


  • Protective plastic cap for sharp pointed blade


  • Excellent cutting on all types of material including sheet rubber, vinyl and adhesive backed papers


  • 6.Cricut Expression Machine:  I LOVE my cricut.  I don't even know where to begin.  I use it on almost everything.  You need one too!  I use it for cutting shapes and titles for cards and layouts.  I even use it with my gypsy for cutting the shapes for my own board books and mini albums.


     7.Cuttlebug:  I love adding texture to all of my projects with my cuttlebug.  It has SO many uses.  I have been head over heels for the Tim Holtz embossing folders and his dies.  The Cuttlebug is a very versatile machine, and it can be used with all brands of dies and embossing folders!


    8.  Stampin' Scrub & Mist

    When I attended my first Stampin' Up! workshop I was impressed by the Stampin' Scrub and Stampin' Mist stamp cleaning products - but not enough to buy them. After all, I was just a scrapbooker at that point who occasionally used stamps on my pages. What I didn't realize then was I would probably use my stamps a bunch more if I'd had an easy way to clean them.


    When I became a demonstrator and received the Stampin' Scrub & Stampin' Mist in my starter kit I realized what I had been missing! I like to tell people that it changed my life - and from a stamping standpoint it really did.


    It couldn't be easier to clean your stamps using these products. The Stampin' Scrub is double-sided; on one side you spray your Stampin' Mist then rub your stamp on it and on the other side you dry your stamp. You are immediately ready to stamp again! Sure, you can use a baby wipe or paper towel to clean your stamps, but that takes longer. And the Stampin' Mist has a conditioner in it that is good for the rubber on your stamps, and it smells great too!


    9.Memento Dye Ink Pad in Tuxedo Black by Tseukineko:  Perfect for use with your Copic markers!  This is the ink recommended for use at the Copic Certification Class.
    Fade-resistant dye ink captures even your most intricate images. 
    Stamped impressions once dried are water resistant and will not migrate.
    Dries on all paper surfaces including coated and textured papers.
    Perfect for finely detailed and solid images.
    Water-based and acid free.


    10. Copic Markers:  COPIC markers are fast-drying, double-ended markers available in 322   colors. COPIC markers are reliable, permanent, non-toxic, and dry acid-free. The nibs are replaceable. Their outstanding performance and versatility have made COPIC markers the choice of professional designers worldwide. COPIC markers are ideal for all your calligraphy, airbrushing, and graphic arts needs. The broad nib offers smooth, consistent coverage for larger areas, while the fine nib allows for easy detail work.

    Saturday, November 27, 2010

    Plants vs. Zombies and No STUPID son-in-laws for me...

    Every day I am amazed by how Estella's mind works and how she expresses herself.  I have never had a boring conversation with my daughter.  Below, is a recent exchange that was just too good to keep to myself.


    Estella comes into my room earlier today, as I am playing the super-addictive and fun "Plants vs. Zombies" game on the xbox 360.  "Are you playing Lance versus the Zombies?"  Estella asks me.  No.  I explain to her that it is PLANTS versus Zombies and there is no Lance that I know of.  So Estella ponders this news for a moment before she tells me: "I had a pretend zombie boyfriend named Lance." to which I say "Really...?"  She says "Yes.  But he was stupid so I got rid of him.  He met some stupid zombie girl. They got married I think.  Then they had a bunch of stupid zombie babies.  This many stupid zombie babies.  (she holds her arms very wide)  Isn't that stupid?"  she asks.


    So this was just another average every day conversation involving Estella and her vivid imagination and over usage of the word "stupid" (my least favorite product of kindergarten) and I can't help but think how she will grow up to be such a smart and interesting little person...maybe she will develop her own zombie soap opera some day?


    Tuesday, August 24, 2010

    Paper Dolls!

    My local art swap group had a paper doll swap his month.  I wanted to do something fun and cute for my dolls, so  I borrowed Saundra's paisley cartridge for the cricut, and cut out a few sets of super cute Russian Stacking Dolls.   My camera's batteries died, so I didn't get a chance to snap any pics before I swapped those out.  I will try to get some pictures from the ladies I swapped them with.  If I can't manage that, I will just have to make some more!
    I signed up for two different sets of dolls.  The second set of dolls I made some extras for Estella, so I had them to take photos after my camera's batteries were finally recharged.  I got the idea for the Kitty Kat Dolls from an art exhibit I saw online.  Now, I have never ever claimed to be an artiste of any caliber, so please keep that in mind.  I started out by hand-drawing the cat shapes I wanted to use.


    It didn't even occur to me at the time that I was drawing the rough draft, that I might not want to use bright orange cardstock!

    Thankfully, the girls at Scrapper's Edge worked their magic and made me some usable copies to work with:


    So this is what I ended up with.  Then I had Amy copy these images to the right onto some cute patterned paper from an old Christmas DCWV stack that I had in my paper stash.  This was my cheater way of having all of the features I wanted on the patterned paper without having to hand-draw each one over.


    The quality of my picture here doesn't really give the colors justice.  Once I had all of my copies, I cute them out and assembled them with tiny silver brads at the joints.  They are fully jointed except for the heads.  I secured their heads with a pop dot-square.  This gave a little depth, and then to finish them off I hung tiny bells around their necks with some brightly colored string.


    These are the finished products.  Minus their "collars".  Thanks so much for looking!  You can he head over to the North Coast Art Swaps yahoo group to see the dolls everyone else made for the swap.

    Tuesday, May 18, 2010

    Background Technique and a Give-away!

    Last Tuesday, our ATC group got together at the LSS for our monthly get together.  We had our best turn-out attendance-wise, so far.  So hopefully we will continue to grow and collect new members and new art to swap.


      I brought along my ever growing collection of Glimmer Mists to share with the group, and do kind of a mini class on the Cling Wrap Background Technique.  The PDF handout for the class can be found here.  We had a great time doing this technique, and everyone created some beautiful backgrounds.  This was a good time for this mini class because this month, one of our swaps on the group, is for hand made background papers.  So I signed up for that one of course.  Can't wait to see what I get in the swap.


    Here is a quick run-down of the class I did:


    Supplies:
    Cardstock (I used white) or Water Color paper, Glimmer Mists-2 or 3 colors, Cling Wrap, Paper Towels, Craft Iron, Brown Paper Bag or Craft Mat (to protect your work surface)


    After gathering the supplies listed above, decide what colors you want to use for your background papers you will be creating.  I personally use two or three colors that work well with each other.  You can go for colors that compliment each other or contrast each other.


    1. Cover your work surface to keep it clean.  I used my graph pad from Stampin' Up.
    2. Place your cardstock or paper in the center of the surface.  Tear off a piece of cling wrap that is a few inches larger than your entire sheet you will be spraying.  Set the cling wrap aside for now.
    3. Mix the bottles of Glimmer Mist that you have chosen to work with.  Do this by "swirling" the bottles until the mica is mixed well throughout the liquid.  Uncap all of the bottles you will be working with.
    4. Randomly spray the Glimmer Mists over the entire surface of the paper, careful not to muddy the colors.  You want to completely cover the sheet with color, but spray so that your colors just barely meet or overlap.
      *please note that the white areas on this sheet are the color "Marshmallow"  which is white in color.


            5.  Quickly cover the sprayed sheet with the cling wrap that you set aside in step number 2.  You do 
                 not want the cling wrap to be smooth.  The more texture on the cling wrap, the more interest to
                 your finished product. This is why you want a piece of cling wrap larger than your paper you are
                 spraying.  This will allow you room to "smoosh" and wrinkle the cling wrap.

           6.  Keep the paper covered with the cling wrap and leave to dry.  You can set it aside and work on
                another set of backgrounds or you can go work on something else until your paper is dry.  The cling 
                wrap must remain on the sheet as it dries. 


           7.  Again, if you are not the most patient person, like myself, you can dry up the last little bit of stubborn
                dampness by aiding it along with your heat gun.  Make sure you remove the cling wrap first!


           8.  Once the page is dry to the touch, you can smooth it out and prepare it for trimming down to size to
                use on your project of choice.  I smooth mine by covering it with a couple of paper towels and and
                iron it flat with my craft iron.


      (here is a picture of a finished sheet.  I did not have the patience to dry the sheet for the tutorial for a photo.  The gold lines are the mica that is channeled into the wrinkles on the cling wrap.)

       Now the give away!  Who doesn't love free artsy stuff?  I went a little crazy one afternoon and made a whole bunch of different color combos using this technique.  So now I have a bunch in my stash.  I will give anyone who leaves a comment on this post a chance to win one of two bundles of ATC size backgrounds.  I have two bundles of 12.  I will give anyone who becomes a follower on my blog a second entry in the drawing.  I will use random.org to pick the winner(s) on Friday, May 21st.  Good Luck!

      Friday, May 7, 2010

      Beautiful Dreamer Layout

       I made this layout on National Scrapbook Day,  during the crop portion of the evening.  I love the way it turned out.  This is one of my favorite layouts that I have ever done.  Estella looks so sweet when she's sleeping.  The journaling is a portion of the Dutch lullaby, "Wynken, Blynken and Nod" by poet Eugene Field.


       I knew I wanted to create a collage of photos for this layout, but after looking at all of the bright, clashing colors of Estella's various pajamas and bedding, I decided to print them in black and white.  Now the photos look even sweeter, and the colors do not clash with the pallet of my layout.
      Here is a detail shot of the upper left corner of my layout.  This shows some of the details of my journaling strips, as well as some of the patterned paper and embellishments I used.  I created the JUMBO scallops by using a 1 3/4" circle punch, and then cutting those in half and lining them up along my border.
      Here is the upper right corner.  More scallops, more journaling, embellishments and you can even see some detail of the embossed patterned papers I used.


      Detail shot of my title.


      Lower left corner with the remainder of my journaling.  Thanks so much for looking!


      National Scrapbook Day Projects

      I am finally getting around to posting some pics from my National Scrapbook Day fun.  My LSS (Scrapper's Edge) hosts an awesome day every year for NSD.  The first half of the day is usually a smattering of classes, followed by a crop in the evening from 3pm to midnight, with food, games and prizes for 25 crafty ladies.

      The first class I attended in the morning was Pixie Stick class, which is a childrens class,  taught by my very talented friend, Saundra James.   We made bottle cap charms.  Estella made an awesome fairy collaged pendant, and I made a super-cute magnet.  I have no idea where Estella has hidden her necklace away, but I do have pics of my magnet that I made.  


      How cute is that!?  It's a little french bulldog wearing a crown.  Too cute!
      Saundra also taught a class using the new Tim Holtz dies.  We made a beautiful flower with his flower die and some used books and glimmer mists.  


      And we made a very cool looking ornament out of grungeboard with the bird and cage die.


      In addition to these projects, I took two classes taught by Ranger Certified Instructor,  Sondra Kirtley.  Every year for NSD Sondra designs a layout all about NSD.  Last year, I got a chance to preview the layout she had designed for NSD 2009, and I dressed myself and my daughter in clothing that would coordinate with my layout! 

      This is such a great idea, Sondra actually takes photos of all of the participants throughout the day, and prints them for us to use on our layouts,  so we could actually have a photo of ourselves working on our layout-to put on our layout!  How great is that?  This year Sondra even emailed me a preview peek of her design so I could plan my wardrobe accordingly.  I tell you-it doesn't get any better than that!


      Here are two cards that Sondra K. designed for us to make on NSD also.  I love anything with dimension, bling and kraft card stock!


      Wednesday, April 14, 2010

      Laughing at the Little Things

       
      Having my wonderful little blackberry has made the once unbearable waits in the car, an opportunity to find random things to amuse myself (and on this occasion, Estella too). We were waiting in the car this morning while Nick ran into our local donut shop. I found this little gem of a video and Estella and I proceeded to break out in fits of laughter. Nick was wondering what the heck was up with us when he came back to the car. The music is just too awesome! Cats on Mars indeed.

      Raven

      Wednesday, April 7, 2010

      Thanks Saundra!!!

      I  had a wonderful evening of crafty goodness at my good friend Saundra J's house last night.  She helped me get my blog looking cute and functional.  I am SO happy with how it looks now.  
      She even helped me set up a flickr account so I can quickly link my project photos directly to this blog.  How cool is that!?  So I was up until after 2 am editing some images that we uploaded, and playing around with things, so I can get them to look the way I like.  
      Saundra even helped me add an awesome button to our Art Swaps Group on Yahoo.  So be sure to check it out and join us for some creative fun!